An example based walkthrough of applying image augmentation using the fastai library
You can find me on twitter @bhutanisanyam1

You can also find the executable code of this blog in this kaggle kernel .For more details on the fastai course, or library: please checkout the course website and library docs.
Introduction to the writeup
The aim of this writeup is to give you a walkthrough of all of the image augmentations in fastai. I’ll start by introducing data augmentation followed by image augmentation.
Then we’ll make a case of why fastai defaults “just works”.
Next, we’ll look at a few real-world use-cases where this transforms will be super useful:
- Building a SOTA neighborhood swimming pool detector
- Building a medical image OCR
- Building a Google Lens Ripoff (Cough, startup, cough)
- Building a Licence plate Detector.
We’ll look at a base image of a cute puppy and first apply the transforms to use it as a reference and then I’ll show the examples of the real world use-cases of the same.
Note that these definitions and explanations are heavily derived from the fastai docs, I’d encourage to you to check it out.
Also, this is not meant to be a code heavy writeup, rather a higher level discussion of where to use the code or when to.
If you want to run the kernel, please follow the link in the sub-title space.
Data Augmentation
Data Augmentation is one of the most common regularisation techniques, especially common in image processing tasks.
When you’re working on a Machine Learning model, your model’s performance is only as good as your data. Depending on what model and problem you’re trying to solve, you’d require a different amount of data.
However, data collection and cleaning is a resource consuming process and might not be always feasible.
A Neural Network, or as typically used for Image processing related purposes: Convolutional Neural Networks, learns about “features” inside of your images.
Why does Image Augmentation work?
Our goal with any machine learning project is to ensure that our code or “model” is able to generalize to real-world data. However, the opposite of this is “overfitting” where your model just learns to recognize features inside of your training dataset.
To avoid this, we “augment” or add slight variations while feeding in our images to the model. Even though rotation of 2 degrees might not make a huge difference to the human eye, such little variations are useful enough to allow the model to generalize well.
To give you an “it just works” example let's try running training a ResNet 50 on the CIFAR-10 dataset with the Image Augmentation ON/OFF.
With augmentations (default ones) enabled, you can see that the model performs better.
Next, I’ll do a deep dive of the image augmentations supported by fastai, and giving the possible example use-cases of where this might be useful.
Image Augmentation using fastai
To apply “transforms” to your dataset, we pass the list of transforms when creating the “ImageDataBunch” objects.
fastai has a list of default recommended transforms which have been derived from intense experimentation by the team, so for starters, I’d recommend trusting these:
tfms = get_transforms()This returns a tuple of length 2, containing 2 lists: One for the training dataset and the other for validation dataset.
The default parameters for the get_transforms function (Source: fastai docs) are:
get_transforms(do_flip:bool=True, flip_vert:bool=False, max_rotate:float=10.0, max_zoom:float=1.1, max_lighting:float=0.2, max_warp:float=0.2, p_affine:float=0.75, p_lighting:float=0.75, xtra_tfms:Optional[Collection[Transform]]=None) → Collection[Transform]The default tuple this generates is:
([RandTransform(tfm=TfmCrop (crop_pad), kwargs={'row_pct': (0, 1), 'col_pct': (0, 1), 'padding_mode': 'reflection'}, p=1.0, resolved={}, do_run=True, is_random=True),
  RandTransform(tfm=TfmAffine (flip_affine), kwargs={}, p=0.5, resolved={}, do_run=True, is_random=True),
  RandTransform(tfm=TfmCoord (symmetric_warp), kwargs={'magnitude': (-0.2, 0.2)}, p=0.75, resolved={}, do_run=True, is_random=True),
  RandTransform(tfm=TfmAffine (rotate), kwargs={'degrees': (-10.0, 10.0)}, p=0.75, resolved={}, do_run=True, is_random=True),
  RandTransform(tfm=TfmAffine (zoom), kwargs={'scale': (1.0, 1.1), 'row_pct': (0, 1), 'col_pct': (0, 1)}, p=0.75, resolved={}, do_run=True, is_random=True),
  RandTransform(tfm=TfmLighting (brightness), kwargs={'change': (0.4, 0.6)}, p=0.75, resolved={}, do_run=True, is_random=True),
  RandTransform(tfm=TfmLighting (contrast), kwargs={'scale': (0.8, 1.25)}, p=0.75, resolved={}, do_run=True, is_random=True)],
 [RandTransform(tfm=TfmCrop (crop_pad), kwargs={}, p=1.0, resolved={}, do_run=True, is_random=True)])
It’s okay if you don’t understand all of the words indexed there. Let’s do a deep dive and try to explore some of these. The case I make by sharing these is: the defaults are always a good starting point unless you’re working on very different data. For ex: Point mutations or inter-galactic images.
Transforms supported by fastai
- brightness
- contrast
- crop
- crop_pad
- dihedral
- dihedral_affine
- flip_lr
- flip_affine
- jitter
- pad
- perspective_warp
- resize
- rotate
- rgb_randomize
- skew
- squish
- symmetric_warp
- tilt
- zoom
- cutout
Convenience function:
- rand_crop
- rand_pad
- rand_zoom
That is a long list! Let’s try and explore these case by case.
Defaults:
I’ve (stolen) borrowed some helper code from the docs:
#Helper functions from fastai docs
def get_ex(): return open_image(path/'images/beagle_192.jpg')

def plots_f(rows, cols, width, height, **kwargs):
    [get_ex().apply_tfms(tfms[0], **kwargs).show(ax=ax) for i,ax in enumerate(plt.subplots(
        rows,cols,figsize=(width,height))[1].flatten())]
This will allow us to look at dog pictures. These will be the base case for comparison. So further, I’ll share the transform, what it does to the base dog picture and where you might find it useful in the real world since our doggy picture might not serve as the best example for all the cases as we’ll see.
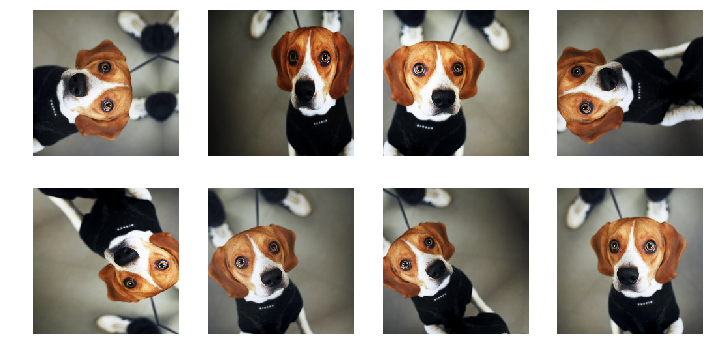
Rotation
(max_rotate=angle) toggles random rotations between -angle to + angle specified here.
tfms = get_transforms(max_rotate=180)Since no one would click pictures of their doggy in these angles. Let’s consider another case:
Real world use case
You’re tasked with finding swimming pools in your neighborhood. You download satellite images but since your region is small, your model overfits.
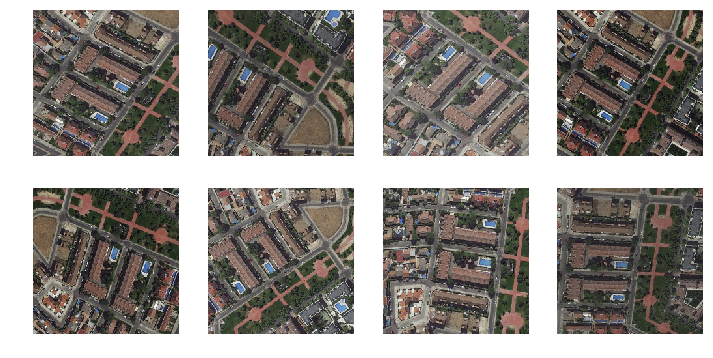
In this case, image augmentation might be useful:
At first looks, I could have lied to you about these being different pictures, isn’t it? I believe this would definitely serve as a good purpose to our model.
RGB Randomise
rgb_randomize(x, channel:int=None, thresh:float=0.3) → Image :: TfmPixel
Images as we know, have 3 channels (red, green, blue AKA RGB). This transform randomizes one of the channels of the input image.
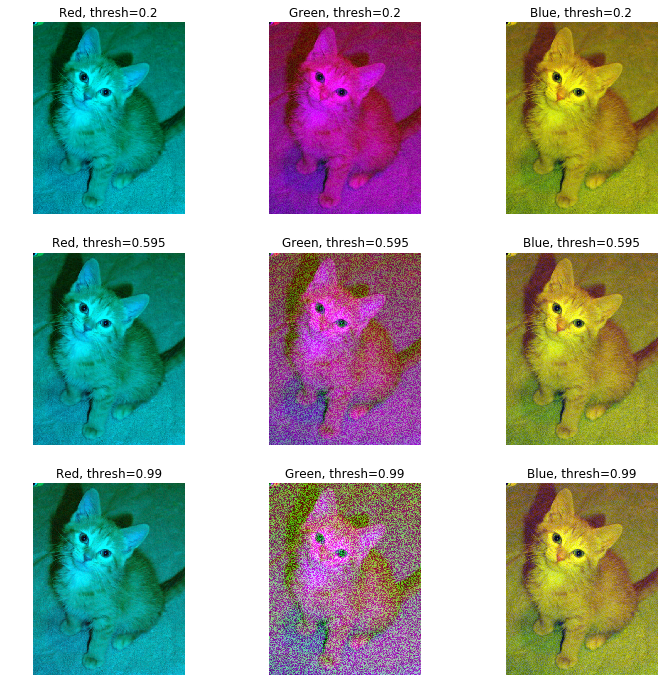
- channel: Which channel (RGB) to randomize.
- thresh: After randomizing, scale the values to not exceed the thresh value
This might be useful in a case where your dataset is supposed to help you detect cars but your interns (or Graduate Student Turk 😛) did a bad job and only collected images of red cars. You can randomize the colors and help the learner generalize better.
Brightness
We can vary the brightness from 0 to 1, 0.5 is the default.

Let’s look at our doggy picture with all variations across the brightness scale. Since the original image was taken pretty perfectly, the augmentation didn’t help here. This is another example of where augmenting your image might ruin your model. So be careful when applying transforms to your data.
Real world use case

With the warning out of our way. Here’s an example from my work: The task is to extract text from this image. Even to the human eyes, this is easier to do when the difference between the background and text is most pronounced. So for ex: Look at 0.3 value-this is the best result for this case.
Contrast
As the name suggests, it allows us to vary the contrast, from a scale of 0 to 2. 1 being the default/original picture.
Here’s our poor doggy image going through yet another set of augmentation:

Personally, I’d vote for the most “contrasted” picture to be the best. Blame it on Instagram filters.
Real world use case
Let’s pick up the previous challenge again. We are tasked to create a character reader that reads characters from the medicine’s image. This works best when the contrast is maximum.
Don’t believe me? Take a look:

Crop
Crop helps crop into mentioned sectors of the image.
Real world use case
You are tasked to build a parking lot billing machine. Since our camera would be fixed at an angle and we can expect mostly sedans to enter in a lot, the number plate would be most probably in a fixed region (Lower middle). Cropping into there will allow our model to focus just on that region, making our and the model’s job easier.
Crop pad
Crop_pad, crops, and pads based on the set mode. The one recommended by fastai dev(s) is “reflection padding”. See the examples below for zero and reflection padding.
Dihedral
Dihedral transforms rotates the images in the 8 possible directions/angles of a dihedron.
Lets first look at what a dihedral angle is:
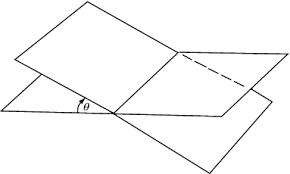
As you might imagine, it will rotate the image in all such possible orientations. Enough definitions, let's look at our innocent puppy in bad angles:
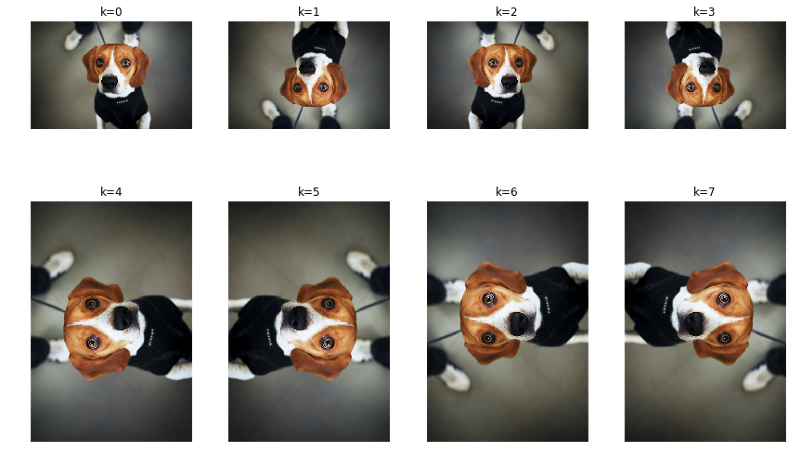
Real world use case
Now, I’ll bet if your taking photos of your puppy at such angles, your on Instagram or a bad parent. Either way, it's not a good example.
Back to our original summer camp mission, we’re spying on the neighborhood using google maps and looking for swimming pools.
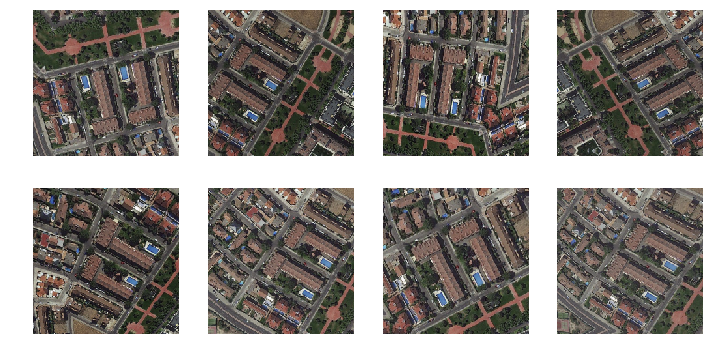
As you can see, in such a case it might make much more sense to rotate the image in these angles. If you didn’t know, these might even look as completely different images in the first glance. Isn’t it?
Jitter
Jitter adds random noise to the image. I’m not sure what the best practical best use-case for the same might be, the magnitude can be set from -x to +x with 0 being the original image.

Real world use case
Behind the scenes, the jitter is random pixel replacement from the neighborhood. Which means, that it might help avoid overfitting (Think its similar to dropout)
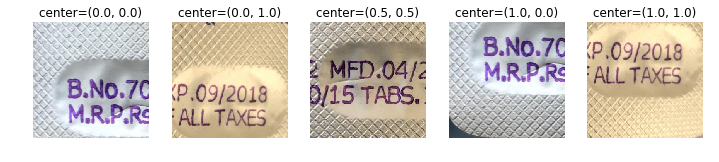
Perspective
This transform changes the perspective of the image as if our object was moved around.
Remember this video from Apple?
That’s exactly what this does.
For reference, lets again look at our puppy first.
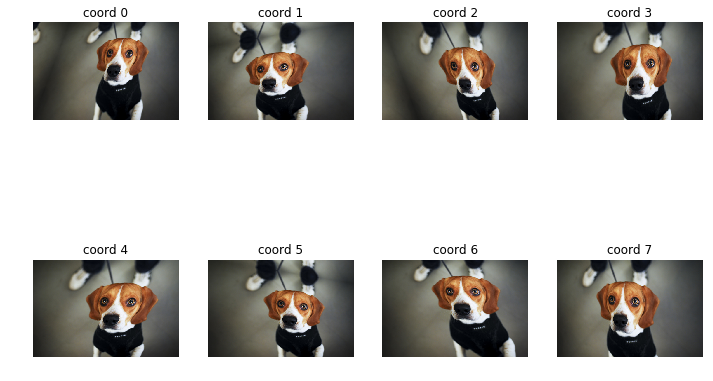
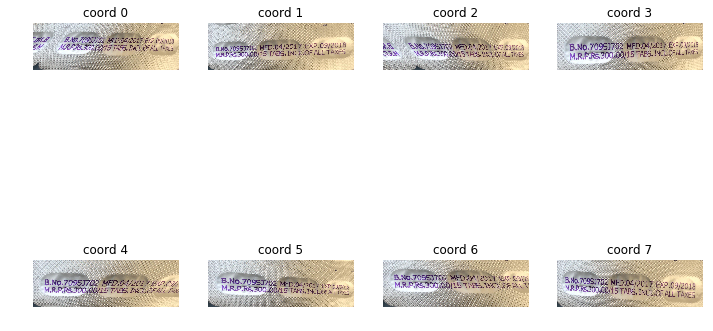
Real world use case
A use-case where this might be useful is, suppose you’re creating a medicine detector where you want the customer to take pictures of the medicine and your “tech” should be able to detect/read all details. Now the customer might not click the photos in the best angles and you’d hate to teach them the same. Rather, you’d just use this transform.
Check these examples:
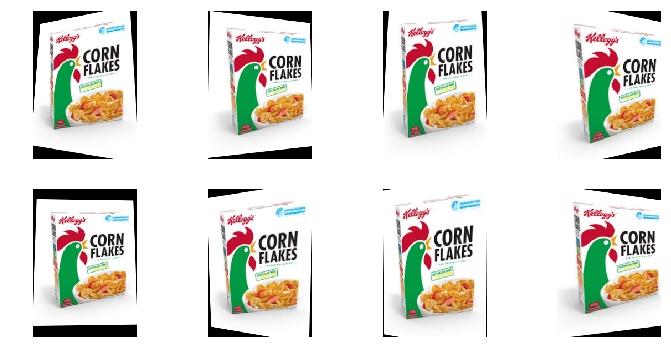
Symmetric Warp
Here’s the definition, from the docs:
Apply the four tilts at the same time, each with a strength given in the vector magnitude.
Let’s look at our pup for reference.
Real world use case
Okay, now for a real-world example. Ever heard of Google Lens?
Its also known as a content retrieval engine/image search engine in the tech clubs. Now, if you think about it, your use of such services really doesn’t care about the right angles. So it's your job to take care of that.
For example, if you’re tasked with building a SOTA cereal detector image engine, the transform will really stand out here:
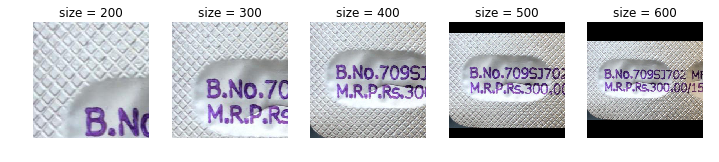
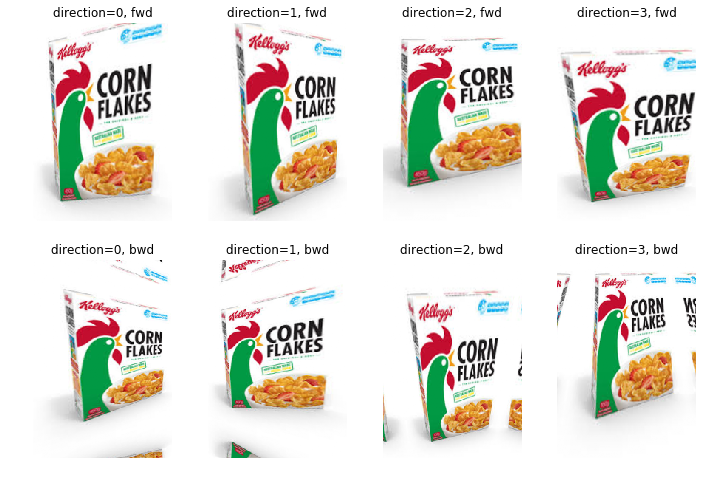
Tilt
Tilt allows “tilting” a field to a random direction and a specified magnitude.
direction is a number (0: left, 1: right, 2: top, 3: bottom). A positive magnitude is a tilt forward (toward the person looking at the picture), a negative magnitude a tilt backward.
Real world use case
I’ll spare our cute puppy and get back to the important task of building a world-class cereal box detector. You can see the transform is really useful again for this use-case:
This was a looong list of transforms and examples. If you’re interested in trying these out, I’d encourage you to checkout my starter kernel.
If you’ve any questions, please shoot me a tweet or leave a comment below.
You can find me on twitter @bhutanisanyam1
Subscribe to my Newsletter for updates on my new posts and interviews with My Machine Learning heroes and Chai Time Data Science