When life gives you tensor cores, you run mixed precision benchmarks
You can find me on twitter @bhutanisanyam1
Checkout the code for this benchmark hereNote of thanks: This benchmark comparison wouldn’t have been possible without the help of Tuatini GODARD, a great friend, an active freelancer. If you’d like to know more about him you can read his complete interview here.
A big thank you to Laurae for many valuable pointers towards improving this post.
The latest version of fastai (2019) just launched, you’d definitely want to check it out: course.fast.ai
Note: This is not a sponsored post from fastai, I’ve taken up the course and have learned a lot from it. Personally, I’d highly recommend it if you’re just getting started with Deep Learning.
This is a quick walkthrough of what FP16 op(s) are, a quick explanation of how mixed precision training works followed by a few benchmarks (well mostly because I wanted to brag to my friend that my Rig is faster than his and partly because of research purposes)
Note: This isn’t a performance benchmark, this is a comparison of training time on 2 builds based on 2080Ti and 1080Ti respectively.
More details later.
What is FP16 and why should you care?
Deep Learning is a bunch of matrix op(s) being handled by your GPU. These generally happen using something called FP32, or 32-bit Floating point matrices.
With the recent architectures and CUDA releases, FP16 or 16-bit Floating point computation has become easy. What this allows you to virtually do is, since you’re using tensors of half the size, you can crunch through more examples by increasing your batch_size: or it allows you to use lesser GPU RAM compared to using FP32 training (Also known as Full Precision Training).
In plain English, you can replace (batch_size) with (batch_size)*2 in your code.
The tensor cores are much faster in FP16 computing, which means that you get a speed/performance boost and use lesser GPU RAM as well!
Wait, it isn’t that easy though
Issues involved with Half Precision (The name is derived as 16-bit floating point variables have half the precision of the 32-bit floating point variables):
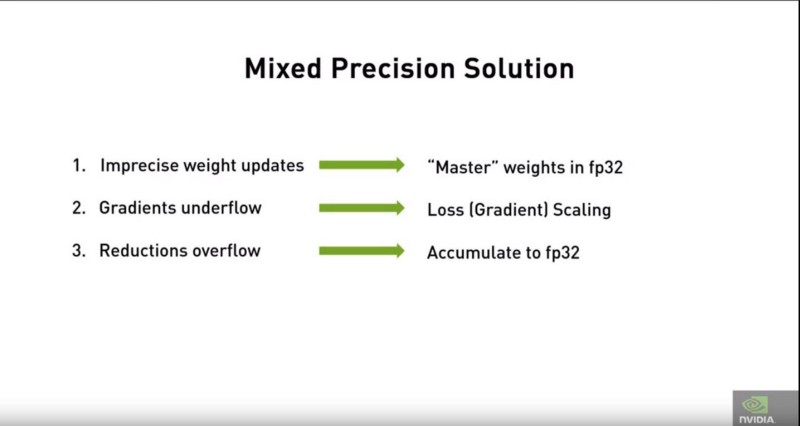
- Weight update is imprecise.
- Gradients can underflow.
- Activations or loss can overflow.
Due to an obvious loss of precision.
Enter, Mixed Precision
Mixed Precision
To avoid the above-mentioned issues, we do operations in FP16 and switch to FP32 wherever we suspect a loss in precision. Hence, Mixed Precision.
Step 1: Use FP16 wherever possible-for faster compute:
The input tensors are converted to fp16 tensors to allow for faster processing

Step 2: Use FP32 to compute loss (To avoid under/overflow):
The tensors are converted back to FP32 to compute loss values in order to avoid under/overflow.
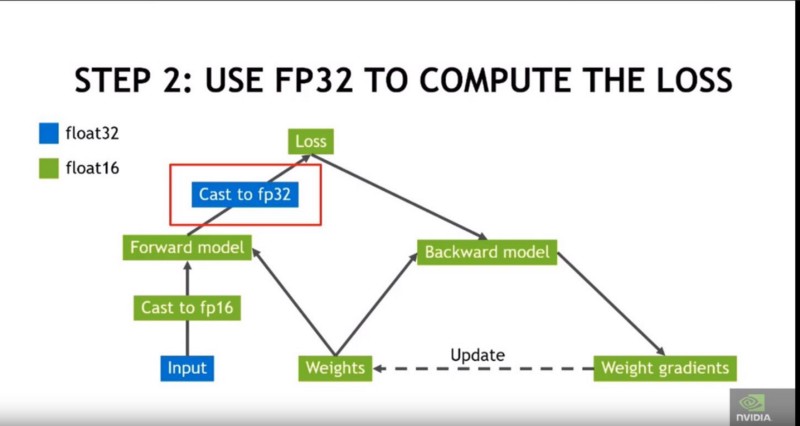
Step 3:
The FP32 tensors are used to update the weights and then converted back to FP16 to allow forward and backward passes.

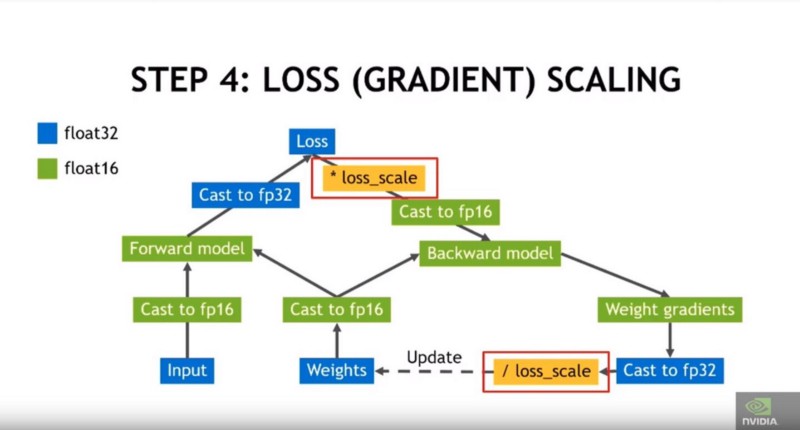
Step 4: Loss scaling is done by multiplying or dividing by a scaling factor:
The loss is scaled by multiplying or dividing by a loss scaling factor.
To Summarize:
Mixed Precision in fast.ai
As one may expect from the library, doing mixed precision training in the library is as easy as changing:
learn = Learner(data, model, metrics=[accuracy])to
learn = Learner(data, model, metrics=[accuracy]).to_fp16()You can read the exact details of what happens when you do that here.
The module allows to change the forward and backward passes of training using fp16 and allowing a speedup.
Internally, the callback ensures that all model parameters (except batchnorm layers, which require fp32) are converted to fp16, and an fp32 copy is also saved. The fp32 copy (the master parameters) is what is used for actually updating with the optimizer; the fp16 parameters are used for calculating gradients. This helps avoid underflow with small learning rates.
RTX 2080Ti Vs GTX 1080Ti Mixed Precision Training

Setup
The Benchmark Notebooks can be found here
- Cuda 10 + corresponding latest Cudnn
- PyTorch + fastai Library (Compiled from source)
- Latest Nvidia drivers (at time of writing)
Our hardware configurations slightly vary so do take the values with a grain of salt.
Tuatini’s setup
- i7–7700K
- 32GB RAM
- GTX 1080Ti (EVGA)
- i7–8700K
- 64GB RAM
- RTX 2080Ti (MSI Gaming Trio X)
Since the process isn’t very RAM intensive nor CPU intensive we chose to share our results here.
Quick Walkthrough:
- Feed in CIFAR-100 data
- Resize the images, enable data augmentation
- Run on all Resnets supported by fastai
Expected output:
- Better performance across all tests for Mixed Precision training.
Individual Graphs
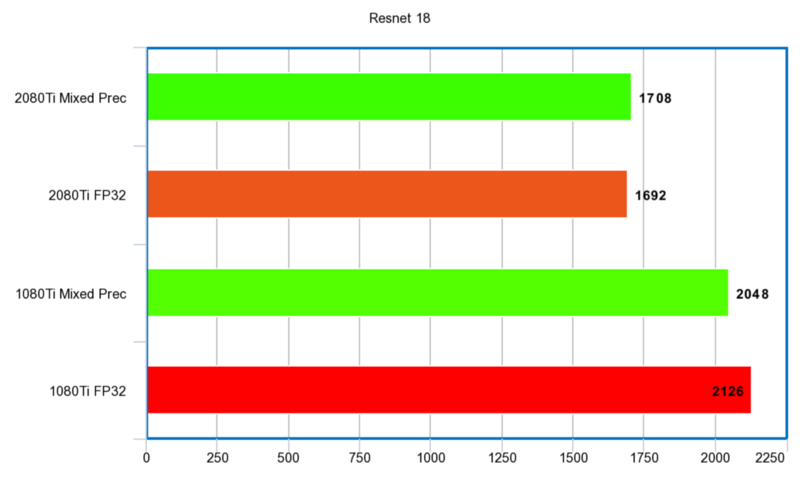
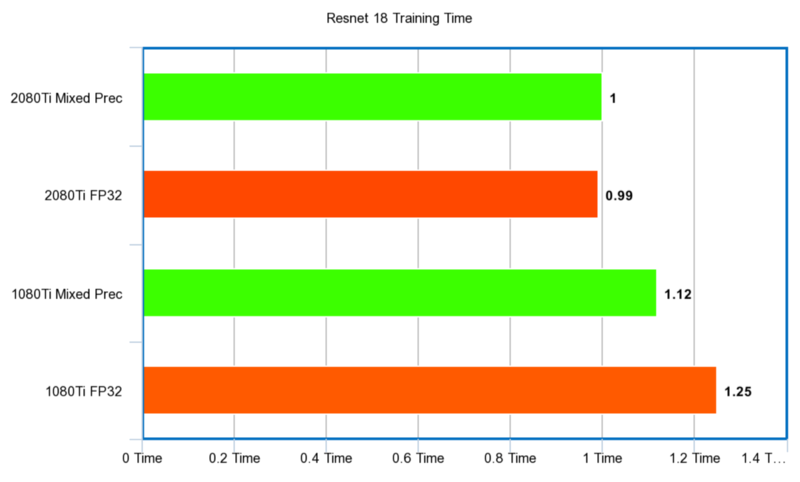
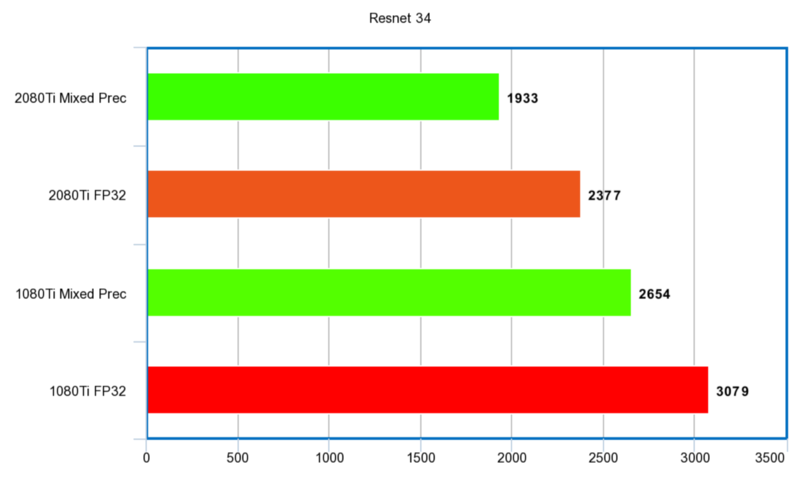
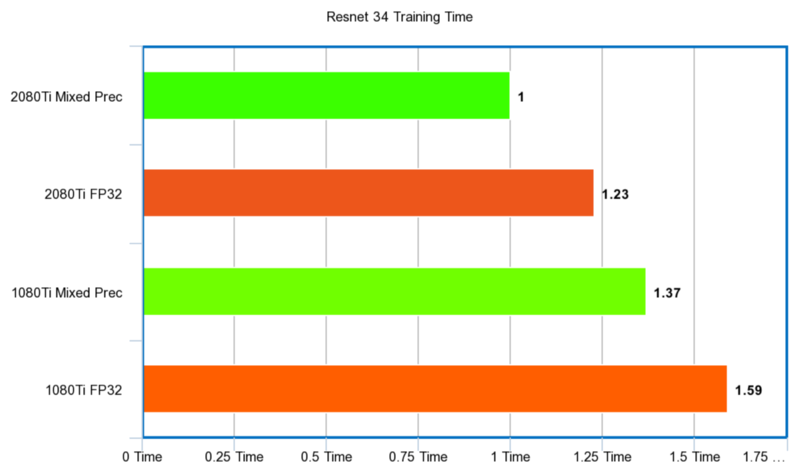
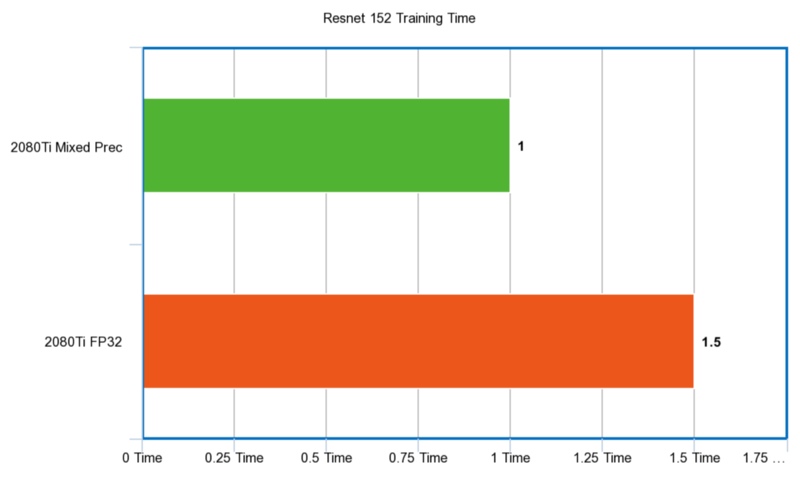
Below are graphs of training times for the respective ResNets.
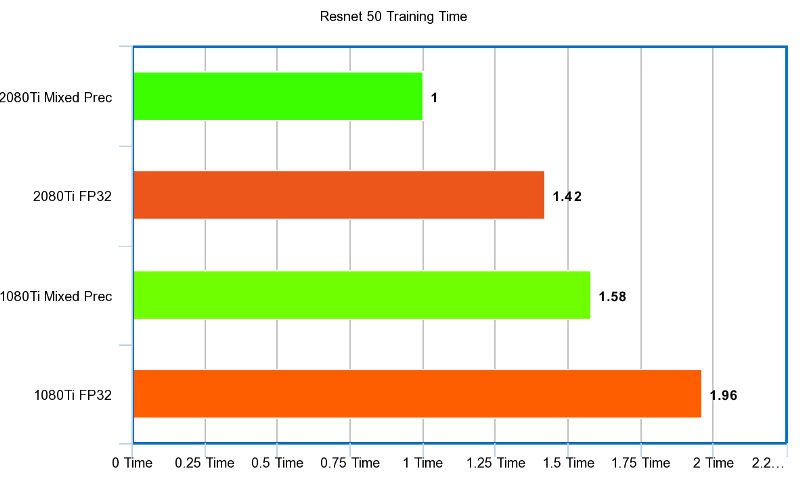
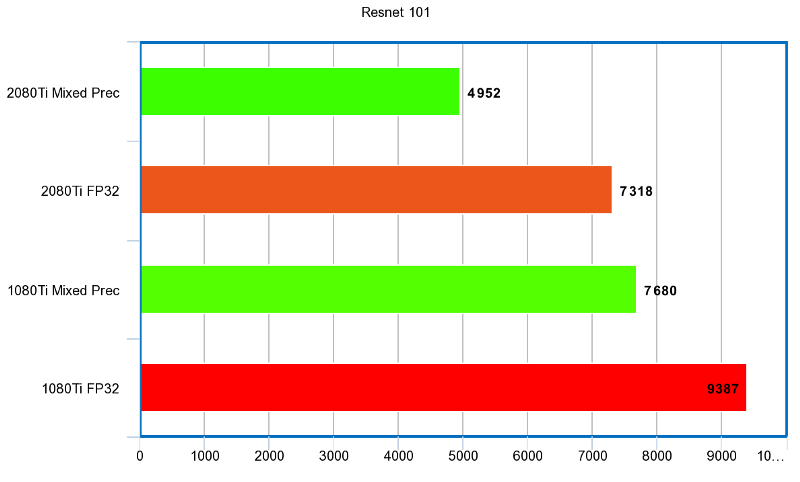
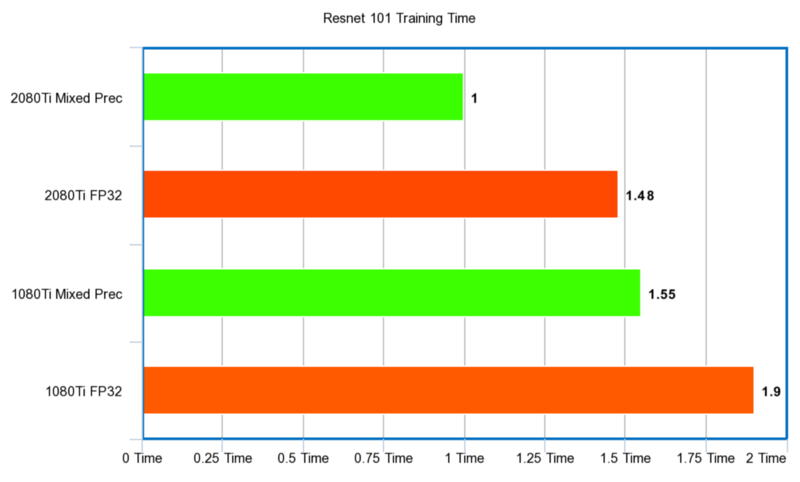
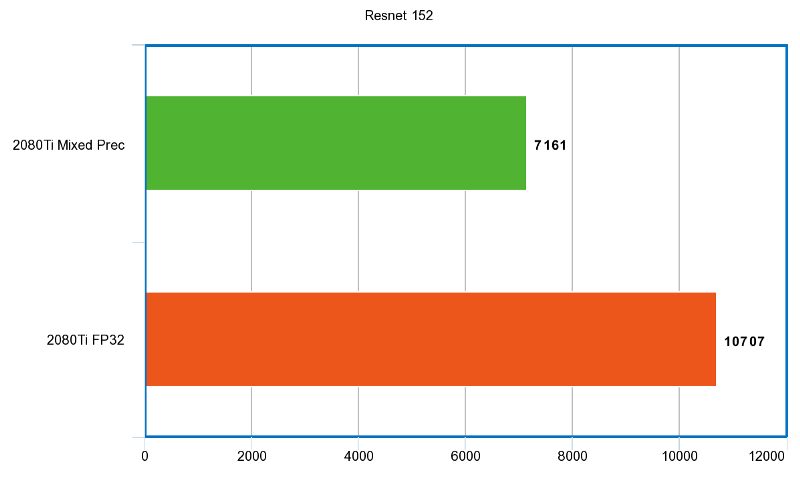
Note: Less is better (X-axis represents time in seconds and scaled time)
Resnet 18
The smallest Resnet of all.
- Time in seconds:
- Time-scaled:
Resnet 34
- Time in seconds:
- Time scaled:
Resnet 50
- Time in seconds:

- Time scaled:
Resnet 101
- Time in seconds:
- Time-scaled:
Resnet 152
- Time in seconds:
- Time-scaled:
World Level Language Modelling using Nvidia Apex
To allow experimentation of Mixed Precision and FP16 training, Nvidia has released Nvidia apex which is a set of NVIDIA-maintained utilities to streamline mixed precision and distributed training in Pytorch. The intention of Apex is to make up-to-date utilities available to users as quickly as possible.
Checkout the repo here
It also features a few examples that we can run directly without much tweaking-this seemed to be another good test for a quick spin.
Language Modelling comparison:
The example in the GitHub repo trains a multi-layer RNN (Elman, GRU, or LSTM) on a language modeling task. By default, the training script uses the Wikitext-2 dataset, provided. The trained model can then be used by the generate script to generate new text.
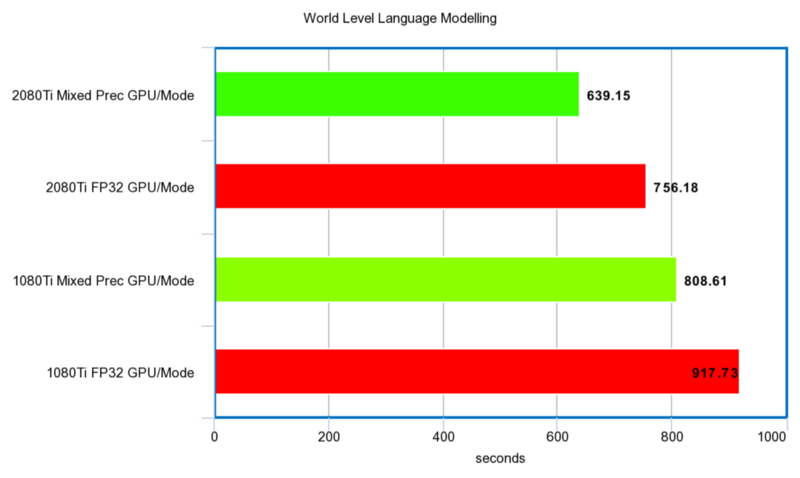
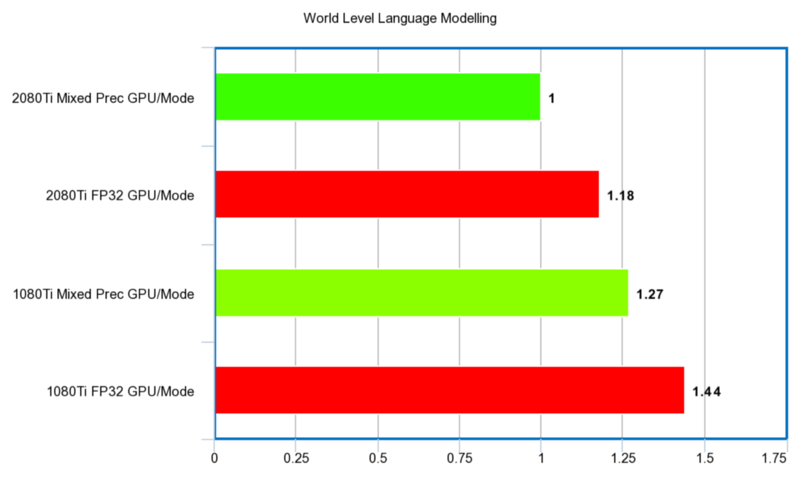
We weren’t concerned with the generation of test-our comparisons are based on training the example for 30 epochs on Mixed Precision, Full Precision for the same batch sizes on the different setups.
Enabling fp16 is as easy as passing a “ — fp16” argument while running the code, APEX works on top of the PyTorch environment that we had already setup. Hence this seemed to be a perfect choice.
Below are the results from the same:
- Time (seconds)
- Time (Scaled):
Conclusion
Although performance-wise the RTX cards are much more powerful than the 1080Ti, for smaller networks especially, the difference in train time isn’t as pronounced as I had expected.
If you decide to try Mixed Precision training, a few bonus points are:
- Bigger batch sizes:
In the test notebooks, we noticed an almost 1.8x increase in batch_size was consistent against all of the Resnet examples that we had tried. - Faster than Full precision training:
If you look at the example of Resnet 101 where the difference is the highest, FP training takes 1.18x time on a 2080Ti and 1.13x time on a 2080Ti for our CIFAR-100 example. A slight speedup is always visible during the training, even for the “smaller” Resnet34 and Resnet50. - Similar accuracy values:
We did not notice any drop in the accuracy values when using Mixed Precision training. - Similar Convergence rate:
We noticed a similar rate of convergence for Mixed Precision Training when compared to Full Precision Training. - Ensure you’re using CUDA>9 and are on the latest version of Nvidia-drivers.
During the testing, we were not able to run the code until we had updated our environments.
- Checkout fastai and Nvidia APEX
If you have any questions, please leave a note or comment below.
Checkout the code for this benchmark here
You can find me on twitter @bhutanisanyam1
Subscribe to my Newsletter for updates on my new posts and interviews with My Machine Learning heroes and Chai Time Data Science
